OCI CLI 설정
이번 문서는 오라클 클라우드 Free Tier 계정을 생성하고 로그인한 상황을 전제로 합니다. 만약에 현재 오라클 클라우드 계정이 없는 상태라면, 다음 문서를 참조하여 오라클 클라우드 계정을 만들고 OCI 콘솔에 로그인하시기 바랍니다. 마지막으로 OCI CLI를 설치해야 합니다.
- OCI FREE TIER 계정 등록
- Free Tier 계정 로그인
- OCI CLI 설치
설치된 OCI CLI가 OCI Tenancy에 접속하고 정상적으로 동작하기 위해서는 OCI CLI 사용자 설정을 해야 합니다. OCI CLI 사용자 설정에는 다음과 같은 정보가 필요합니다.
- User OCID
- Tenancy OCID
- Region
이번 문서에서는 OCI CLI 사용자 설정 정보를 확인하고 OCI CLI에 사용자 정보를 설정하는 과정을 소개합니다. 다음과 같은 목차로 진행됩니다.
OCI CLI 설정 정보 수집
User OCID
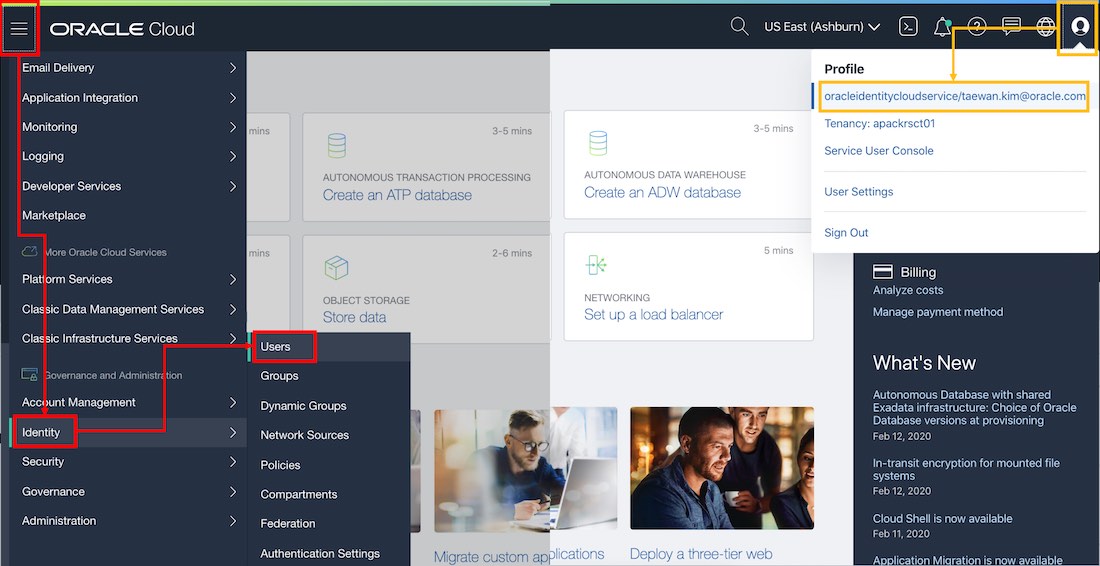
User OCID는 OCI Console의 OCI User 상세 페이지에서 확인할 수 있습니다. 현재 로그인 사용자의 OCI User 상세 페이지는 다음 메뉴 패스로 이동할 수 있습니다.
- 오른쪽 위 OCI User Icon 오른쪽 위 OCI User Icon 사용자 ID
- (OCI 콘솔 왼쪽 위 햄버그 버튼) Identity Users 사용자 목록에서 로그인 ID 클릭
다음 그림과 같이 위 메뉴 패스를 통해서 OCI User 상세 페이지로 이동할 수 있습니다.
OCI User 상세 페이지에서 다음 그림과 같이 copy 링크를 클릭하여 User OCID를 복사할 수 있습니다.
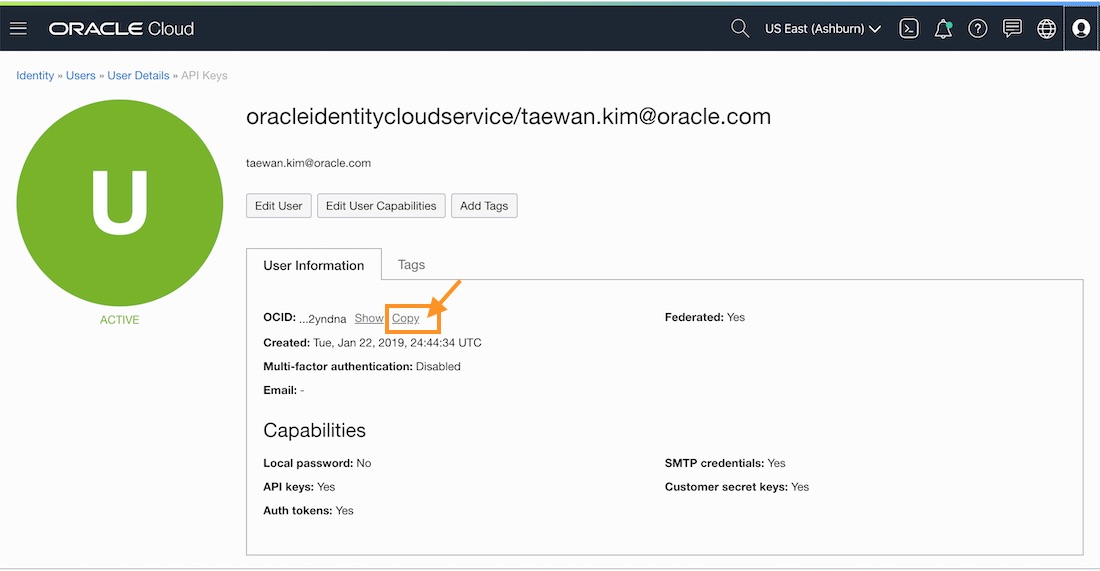
위에서 복사한 User OCID는 다음과 같은 패턴을 갖습니다.
ocid1.user.oc1..aaaaaaaaqddvfo3p4tprztewinniya3zebqdqgpbnk4cjspyzcluzi2yndna
Tenancy 명과 Tenancy OCID
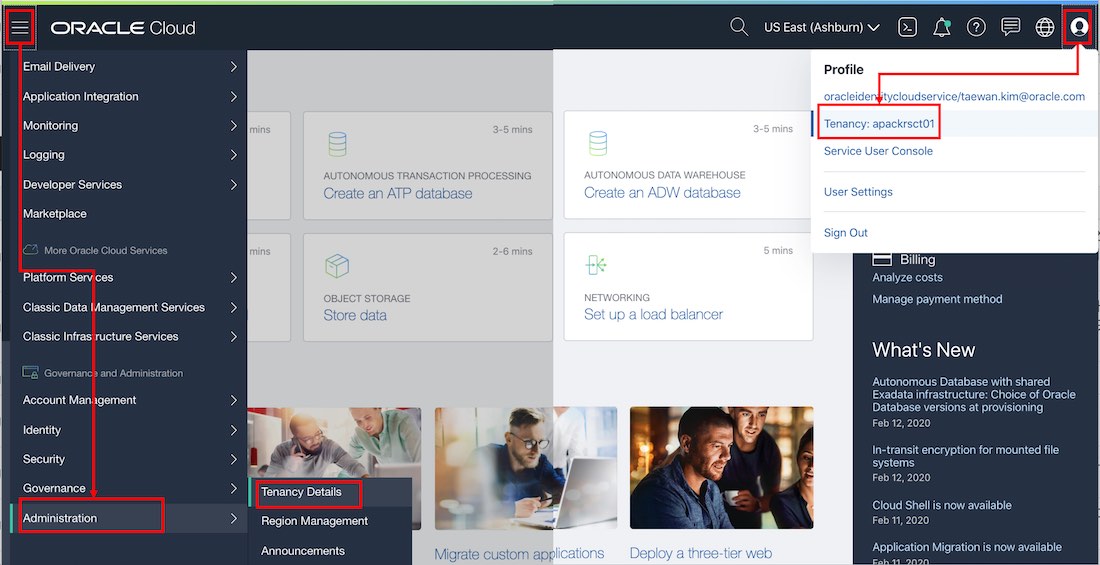
Tenancy 명과 Tenancy OCID는 OCI Console의 Tenancy 상세 페이지에서 확인할 수 있습니다. Tenancy 상세 페이지는 다음 메뉴 패스로 이동할 수 있습니다.
- 오른쪽 위 OCI User Icon 오른쪽 위 OCI User Icon 사용자 ID
- (OCI 콘솔 왼쪽 위 햄버그 버튼) Identity Users 사용자 목록에서 로그인 ID 클릭
다음 그림과 같이 위 메뉴 패스를 통해서 Tenancy 상세 페이지로 이동할 수 있습니다.
Tenancy 상세 페이지에서 Tenancy 이름을 확인할 수 있고 다음 그림과 같이 copy 링크를 클릭하여 Tenancy OCID를 복사할 수 있습니다.
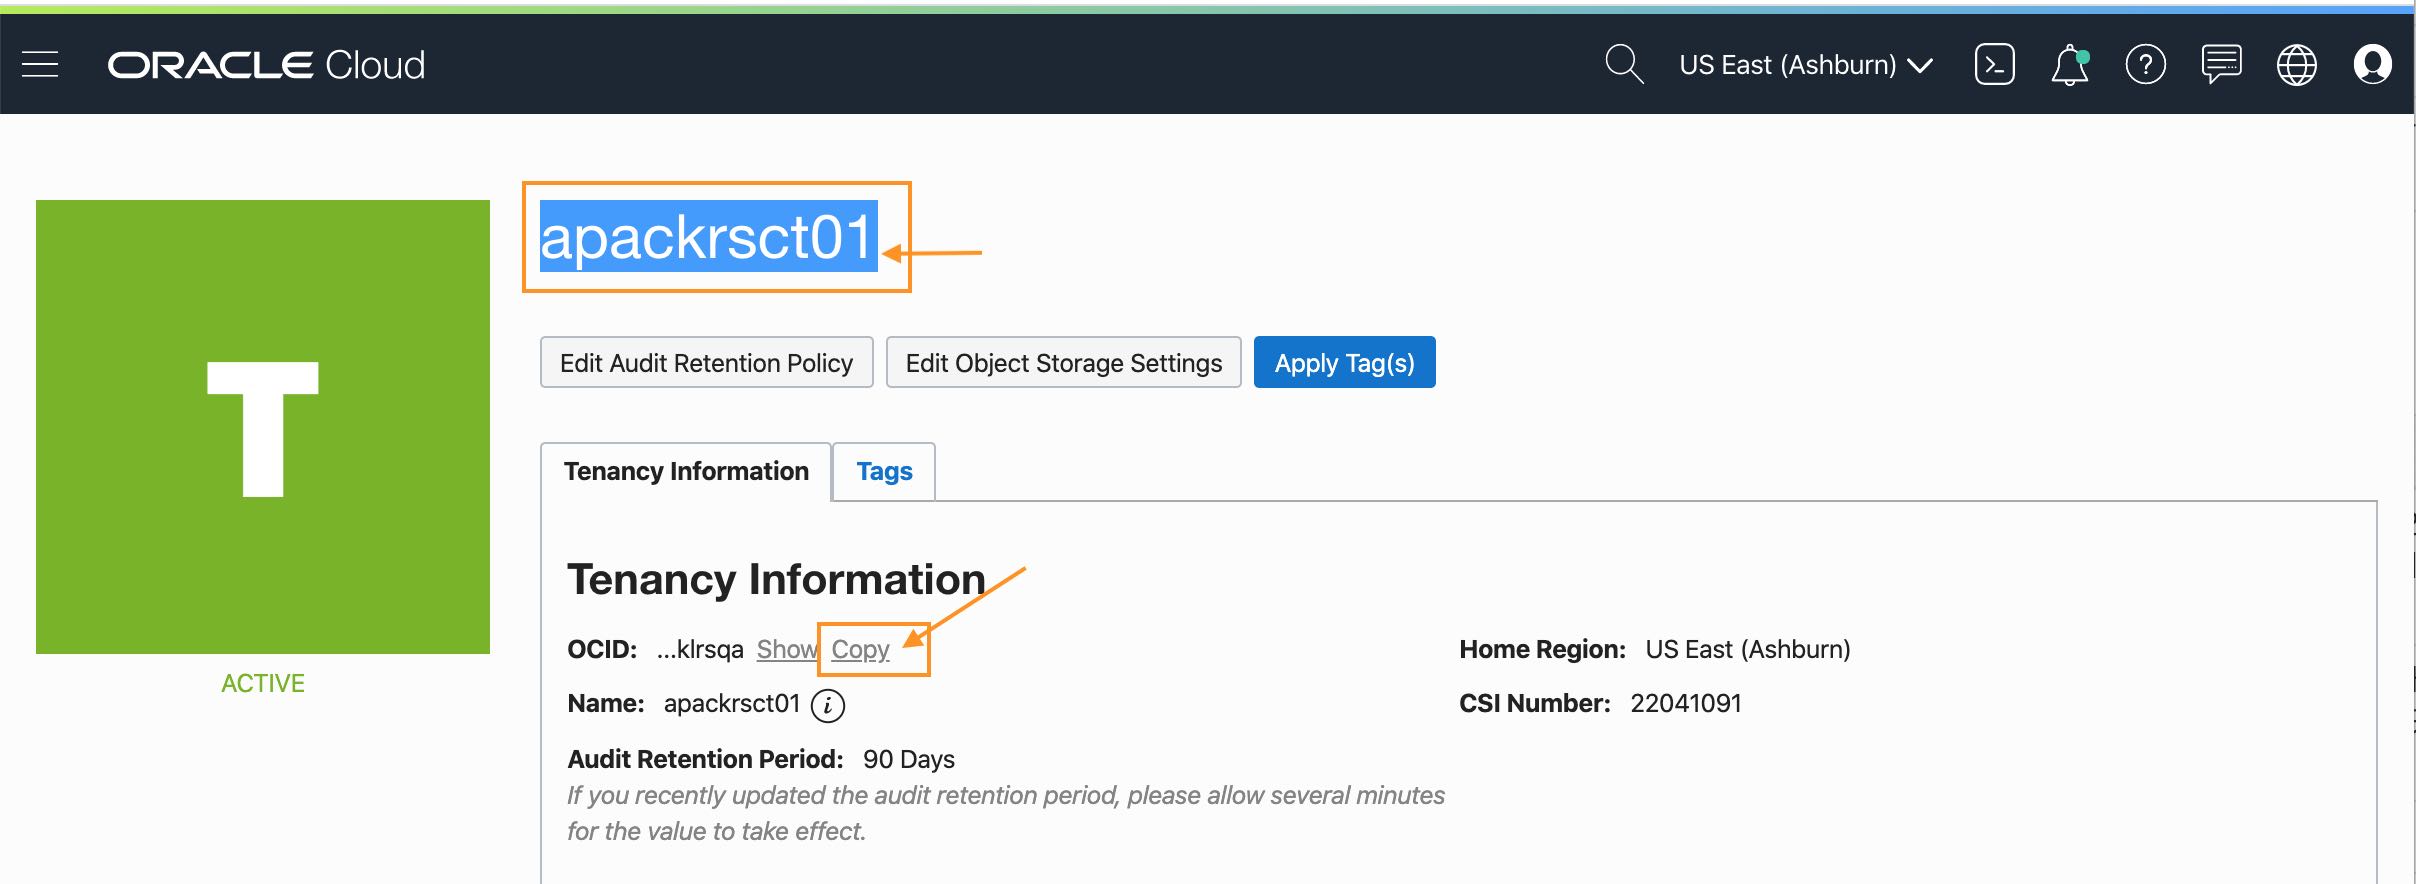
위에서 복사한 Tenancy 이름과 Tenancy OCID는 다음과 같은 패턴을 갖습니다.
Tenancy 명: apackrsct01
ocid1.tenancy.oc1..aaaaaaaa6ma7kq3bsiddduzqidv22cajs3fpesgpqmmsgxihlbcemkklrsqa
Region ID
사용할 Region 명은 다음 그림과 같이 OCI Console의 오른쪽 위 메뉴에서 확인할 수 있습니다.

위 그림에서 현재 계정이 사용하는 리전 이름은 Ashburn입니다. Ashburn의 Region ID는 다음 링크 페이지에서 확인할 수 있습니다.
[taewan.kim/ocidocs] OCI 리전 정보위 링크에서 Ashburn의 Region ID는 us-ashburn-1인 것을 확인할 수 있습니다.
OCI CLI 기본 설정 및 확인
앞에서 OCI CLI 설정에 필요한 정보를 확인했습니다. 앞에서 확인한 정보는 다음과 같이 설정표로 나타낼 수 있습니다.
| 항목 | 항목 값 |
|---|---|
| User OCID | ocid1.user.oc1..aaaaaaaaqddvfo3p4tprztewinniya3zebqdqgpbnk4cjspyzcluzi2yndna |
| Tenancy OCID | ocid1.tenancy.oc1..aaaaaaaa6ma7kq3bsiddduzqidv22cajs3fpesgpqmmsgxihlbcemkklrsqa |
| Region ID | us-ashburn-1 |
기본 설정
OCI CLI는 다음 명령으로 환경 설정을 구성할 수 있습니다.
oci setup config
위 명령을 실행하면 몇 가지 입력이 요청됩니다. 각 입력 항목은 다음과 같습니다. 아래 표의 입력 값에서 엔터는 ‘return’ 키 입력을 의미합니다. 각 질문 항목에 대한 기본 값은 사용하는 OS의 Account에 따라서 달라집니다.
| 입력항목 | 입력 값 | 설명 |
|---|---|---|
| Enter a location for your config | 엔터 | 파일 위치: $HOME/.oci/config |
| Enter a user OCID | 위 설정표의 User OCID | 앞에서 조사한 값 |
| Enter a tenancy OCID | 위 설정표의 Tenancy OCID | 앞에서 조사한 값 |
| Enter a region | u위 설정표의 Region ID | 앞에서 조사한 값 |
| Do you want to generate a new RSA key pair? (If you decline you will be asked to supply the path to an existing key.) [Y/n] | 엔터 | RSA 키 쌍 파일 생성 |
| Enter a directory for your keys to be created [/Users/taewan/.oci] | 엔터 | 기본 위치 사용 권장 |
| Enter a name for your key [oci_api_key] | 엔터 | RSA 키 파일 명 |
| Enter a passphrase for your private key (empty for no passphrase) | 엔터 | 입력값 없음 |
위 입력값으로 실행한 oci setup config의 전체 실행 로그는 다음과 같습니다.
$ oci setup config
    This command provides a walkthrough of creating a valid CLI config file.

    The following links explain where to find the information required by this
    script:

    User OCID and Tenancy OCID:

        https://docs.cloud.oracle.com/Content/API/Concepts/apisigningkey.htm#Other

    Region:

        https://docs.cloud.oracle.com/Content/General/Concepts/regions.htm

    General config documentation:

        https://docs.cloud.oracle.com/Content/API/Concepts/sdkconfig.htm


Enter a location for your config [/Users/taewan/.oci/config]:
Enter a user OCID: ocid1.user.oc1..aaaaaaaaqddvfo3p4tprztenweniyg3zebqgqgpbnk4cjspyzcluzi2yndna
Enter a tenancy OCID: ocid1.tenancy.oc1..aaaaaaaa6ma7kq3bsif76uzqidv22cajs3fpesgpqmmsgxihlbcemkklrsqa
Enter a region (e.g. ap-melbourne-1, ap-mumbai-1, ap-osaka-1, ap-seoul-1, ap-sydney-1, ap-tokyo-1, ca-toronto-1, eu-amsterdam-1, eu-frankfurt-1, eu-zurich-1, me-jeddah-1, sa-saopaulo-1, uk-gov-london-1, uk-london-1, us-ashburn-1, us-gov-ashburn-1, us-gov-chicago-1, us-gov-phoenix-1, us-langley-1, us-luke-1, us-phoenix-1): us-ashburn-1
Do you want to generate a new RSA key pair? (If you decline you will be asked to supply the path to an existing key.) [Y/n]:
Enter a directory for your keys to be created [/Users/taewan/.oci]:
Enter a name for your key [oci_api_key]:
Public key written to: /Users/taewan/.oci/oci_api_key_public.pem
Enter a passphrase for your private key (empty for no passphrase):
Private key written to: /Users/taewan/.oci/oci_api_key.pem
Fingerprint: aa:41:d3:08:3d:f1:61:19:ad:9e:db:bc:2e:de:82:43
Config written to /Users/taewan/.oci/config


    If you haven't already uploaded your public key through the console,
    follow the instructions on the page linked below in the section 'How to
    upload the public key':

        https://docs.cloud.oracle.com/Content/API/Concepts/apisigningkey.htm#How2

 $
위 명령이 실행되면 $HOME/.ocn/config 파일에 다음과 같은 설정이 만들어집니다.
$ cat $HOME/.oci/config
[DEFAULT]
user=ocid1.user.oc1..aaaaaaaaqddvfo3p4tprztewinniya3zebqdqgpbnk4cjspyzcluzi2yndna
fingerprint=aa:41:d3:08:3d:f1:61:19:ad:9e:db:bc:2e:de:82:43
key_file=/Users/taewan/.oci/oci_api_key.pem
tenancy=ocid1.tenancy.oc1..aaaaaaaa6ma7kq3bsiddduzqidv22cajs3fpesgpqmmsgxihlbcemkklrsqa
region=us-ashburn-1
 $
RSA 공개키 등록
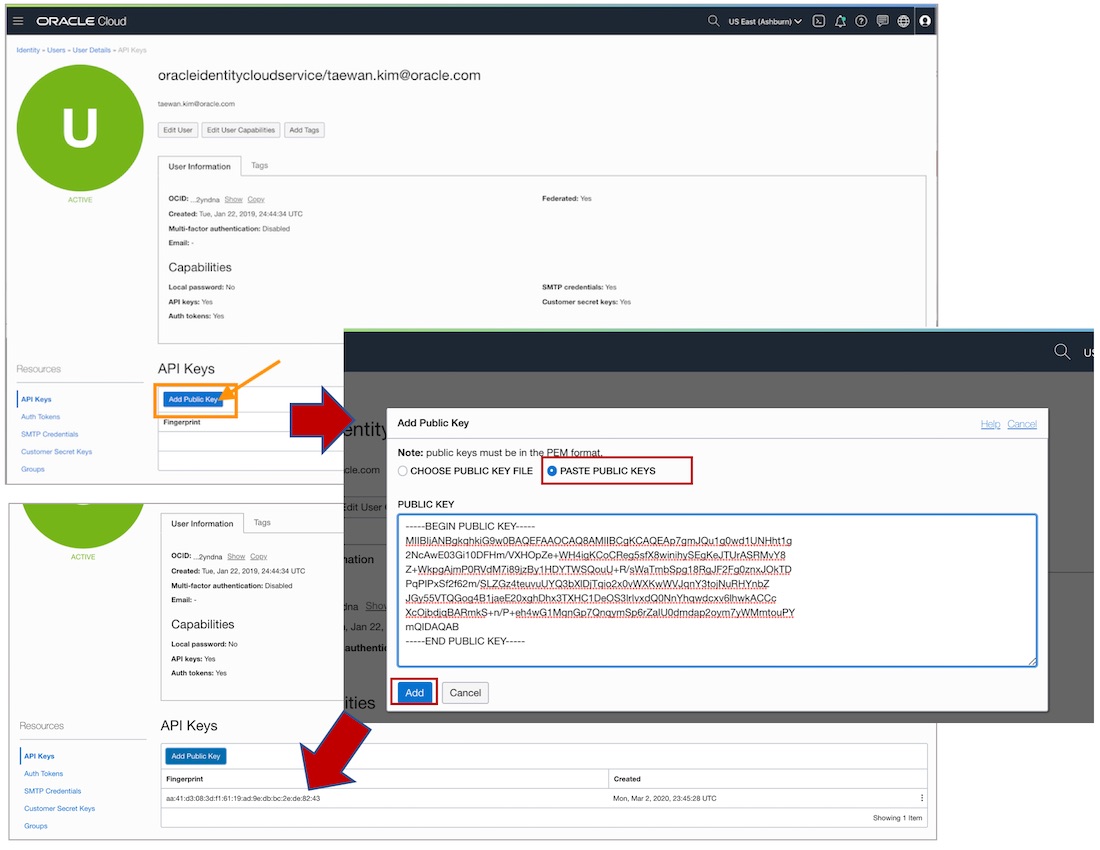
$HOME/.oci/config 파일에 default 프로파일이 만들어진 것을 확인할 수 있습니다. 이 default 프로파일에 등록된 RSA 키 파일의 공개키를 OCI User 페이지에 등록합니다. $HOME/.oci/oci_api_key_public.pem 공개키 파일의 내용을 OCI User에 등록합니다.
 $ cat $HOME/.oci/oci_api_key_public.pem
-----BEGIN PUBLIC KEY-----
MIIBIjANBgkqhkiG9w0BAQEFAAOCAQ8AMIIBCgKCAQEAp7gmJQu1g0wd1UNHht1g
2NcAwE03Gi10DFHm/VXHOpZe+WH4igKCoCReg5sfX8winihySEgKeJTUrASRMvY8
Z+WkpgAjmP0RVdM7i89jzBy1HDYTWSQouU+R/sWaTmbSpg18RgJF2Fg0znxJOkTD
PqPIPxSf2f62m/SLZGz4teuvuUYQ3bXlDjTqio2x0vWXKwWVJqnY3tojNuRHYnbZ
JGy55VTQGog4B1jaeE20xghDhx3TXHC1DeOS3lrIvxdQ0NnYhqwdcxv6lhwkACCc
XcOjbdjqBARmkS+n/P+eh4wG1MqnGp7QnqymSp6rZaIU0dmdap2oym7yWMmtouPY
mQIDAQAB
-----END PUBLIC KEY-----
$
OCI Console에서 오른쪽 위 사용자 프로파일 패스로 OCI User 사용자 상세 페이지에 이동합니다.

OCI User 사용자 상세 페이지에서 위 공개키 값을 다음과 같이 등록합니다.
OCI CLI 설정 테스트
모든 설정이 정상적으로 설정되었다면, 다음 명령은 Tenancy 이름을 출력합니다.
 $ oci os ns get
{
  "data": "apackrsct01"
}
 $
OCI CLI 추가 프로파일 등록
Default 프로파일을 등록한 후 추가 프로파일을 등록하는 방법을 소개합니다. OCI CLI의 설정 파일인 $HOME/.oci/config에 seoul 프로파일을 등록하는 절차를 등록합니다.
oci setup config
위 명령을 실행하면 몇 가지 입력이 요청됩니다. 각 입력 항목은 다음과 같습니다. 아래 표의 입력 값에서 엔터는 ‘return’ 키 입력을 의미합니다. 각 질문 항목에 대한 기본 값은 사용하는 OS의 Account에 따라서 달라집니다.
| 입력항목 | 입력 값 | 설명 |
|---|---|---|
| Enter a location for your config [/Users/taewan/.oci/config] | 엔터 | 파일 위치: $HOME/.oci/config |
| config file: /Users/taewan/.oci/config already exists. Do you want add a profile here? (If no, you will be prompted to overwrite the file) [Y/n] | 위 설정표의 User OCID | 앞에서 조사한 값 |
| Enter the name of the profile you would like to create | seoul | 프로파일 이름 |
| Enter a tenancy OCID | 위 설정표의 Tenancy OCID | 앞에서 조사한 값 |
| Enter a region | 위 설정표의 Region ID | 앞에서 조사한 값 |
| Do you want to generate a new RSA key pair? (If you decline you will be asked to supply the path to an existing key.) [Y/n] | n | RSA 키 쌍 생성하지 않음 |
| Enter the location of your private key file | $HOME/.oci/oci_api_key.pem | 기본 비밀키 파일 위치/이름 |
위 설정값을 입력한 전체 실행 로그는 다음과 같습니다.
 $ oci setup config
    This command provides a walkthrough of creating a valid CLI config file.

    The following links explain where to find the information required by this
    script:

    User OCID and Tenancy OCID:

        https://docs.cloud.oracle.com/Content/API/Concepts/apisigningkey.htm#Other

    Region:

        https://docs.cloud.oracle.com/Content/General/Concepts/regions.htm

    General config documentation:

        https://docs.cloud.oracle.com/Content/API/Concepts/sdkconfig.htm


Enter a location for your config [/Users/taewan/.oci/config]:
Config file: /Users/taewan/.oci/config already exists. Do you want add a profile here? (If no, you will be prompted to overwrite the file) [Y/n]:
Enter the name of the profile you would like to create:  seoul
Enter a user OCID: ocid1.user.oc1..aaaaaaaaqddvfo3p4tprztenweniyg3zebqgqgpbnk4cjspyzcluzi2yndna
Enter a tenancy OCID: ocid1.tenancy.oc1..aaaaaaaa6ma7kq3bsif76uzqidv22cajs3fpesgpqmmsgxihlbcemkklrsqa
Enter a region (e.g. ap-melbourne-1, ap-mumbai-1, ap-osaka-1, ap-seoul-1, ap-sydney-1, ap-tokyo-1, ca-toronto-1, eu-amsterdam-1, eu-frankfurt-1, eu-zurich-1, me-jeddah-1, sa-saopaulo-1, uk-gov-london-1, uk-london-1, us-ashburn-1, us-gov-ashburn-1, us-gov-chicago-1, us-gov-phoenix-1, us-langley-1, us-luke-1, us-phoenix-1): ap-seoul-1
Do you want to generate a new RSA key pair? (If you decline you will be asked to supply the path to an existing key.) [Y/n]: n
Enter the location of your private key file: /Users/taewan/.oci/oci_api_key.pem
Fingerprint: aa:41:d3:08:3d:f1:61:19:ad:9e:db:bc:2e:de:82:43
Config written to /Users/taewan/.oci/config


    If you haven't already uploaded your public key through the console,
    follow the instructions on the page linked below in the section 'How to
    upload the public key':

        https://docs.cloud.oracle.com/Content/API/Concepts/apisigningkey.htm#How2

 $
위 명령을 실행하면 $HOME/.oci/config에 SEOUL 프로파일이 추가된 것을 확인할 수 있습니다.
 $ cat /Users/taewan/.oci/config
[DEFAULT]
user=ocid1.user.oc1..aaaaaaaaqddvfo3p4tprztenwiniyg3aaaqgqgpbnk4cjspyzcluzi2yndna
fingerprint=aa:41:d3:08:3d:f1:61:19:ad:9e:db:bc:2e:de:82:43
key_file=/Users/taewan/.oci/oci_api_key.pem
tenancy=ocid1.tenancy.oc1..aaaaaaaa6ma7kq3bsif76uzqidv22cajsasbcsgpqmmsgxihlbcemkklrsqa
region=us-ashburn-1


[SEOUL]
user=ocid1.user.oc1..aaaaaaaaqddvfo3p4tprztenwiniyg3aaaqgqgpbnk4cjspyzcluzi2yndna
fingerprint=aa:41:d3:08:3d:f1:61:19:ad:9e:db:bc:2e:de:82:43
key_file=/Users/taewan/.oci/oci_api_key.pem
tenancy=ocid1.tenancy.oc1..aaaaaaaa6ma7kq3bsif76uzqidv22cajsasbcsgpqmmsgxihlbcemkklrsqa
region=ap-seoul-1

 $
RSA 공개키 등록
OCI User는 글로벌 객체입니다. 앞에서 디폴트 프로파일을 설정할 때 RSA 공개 키를 OCI User 상세 페이지에 등록했습니다. 새로 등록한 Seoul 프로파일이 디폴트 프로파일에서 사용한 RAS 키를 사용한다면 추가로 RSA 공개키를 등록할 필요가 업습니다.
새로 등록한 프로파일이 기존에 등록한 RAS 키가 아닌 새로운 RAS 키를 사용한다면 앞에서 등록한 절차에 따라 RAS 공개키를 OCI User 상세 페이지에 등록해야 합니다.
OCI CLI 설정 테스트
OCI 명령을 실행할 때 –profile 옵션에 프로파일 이름을 지정할 수 있습니다. 프로파일 이름을 지정하지 않으면 DEFAULT 프로파일이 적용됩니다.
 $ oci os ns get --profile SEOUL
{
  "data": "apackrsct01"
}
 $ oci os ns get --profile DEFAULT
{
  "data": "apackrsct01"
}
 $ oci os ns get
{
  "data": "apackrsct01"
}
 $
